4060 SUSPENSION SETUP
Our number one tip for making sure you get the maximum performance out of your bike is to make sure the suspension is tuned to you and the way you ride.
The good news? Even though suspension is a complex subject, getting a good baseline setting for your bike is pretty simple.
Let’s kick this off.
There are three key ways of adjusting the feel of your suspension.
Sag: This is how much the suspension compresses when you are on the bike.
Compression damping: This controls the rate at which the shock compresses.
Rebound damping: This controls the rate at which the shock extends after compressing.
As each model of shock and fork differs slightly, it is always worth reading the suspension manufacturers’ manual for details. The one that came with your bike? Yeah, that’s the one. But our setup guide should provide you with a good baseline to work from as well.
Remember, these are our recommended starting points. You may find that, riding in bike parks you prefer less sag and lots of compression damping, whereas if you ride steep, slow-speed trails you want more sag and slower rebound. For example.
The best way to find out what works for you is to play with the settings. Once you have a baseline setup make a note of your settings and experiment to find the suspension setup that works best for how you ride.
What do I need to set up the suspension on my 4060?
To set up the suspension on a bike with air suspension you’ll need the following:
- A shock pump (for air suspension)
- A ruler
- Scales
- A wall or friend to lean against
How do I set up the air shock on my 4060?
- Weigh yourself in your riding gear, including any packs you normally ride with. No cheating.
- Make sure all adjustments on the damper are fully open. Turn the compression adjuster fully counter-clockwise and any levers into the open position.
- Make sure the shock is fully deflated.
- Attach the shock pump to the shock’s valve and inflate the air chamber to 100psi.
- Detach the pump and compress the suspension five times by pushing down on the saddle. This will equalize the positive and negative air springs.
- Re-attach the shock pump and set the shock air pressure (psi) to match your weight in pounds. Make sure not to exceed the maximum pressure stated on the shock.
- With the air pump attached to the shock valve, slowly cycle your shock through 25% of its travel 10 times as you reach your desired pressure.
- Remove the pump.
- Sit still on the bike in your normal riding position, using a wall or friend for support.
- Pull the sag indicator o-ring up against the air sleeve seal.
- Carefully dismount the bike without bouncing.
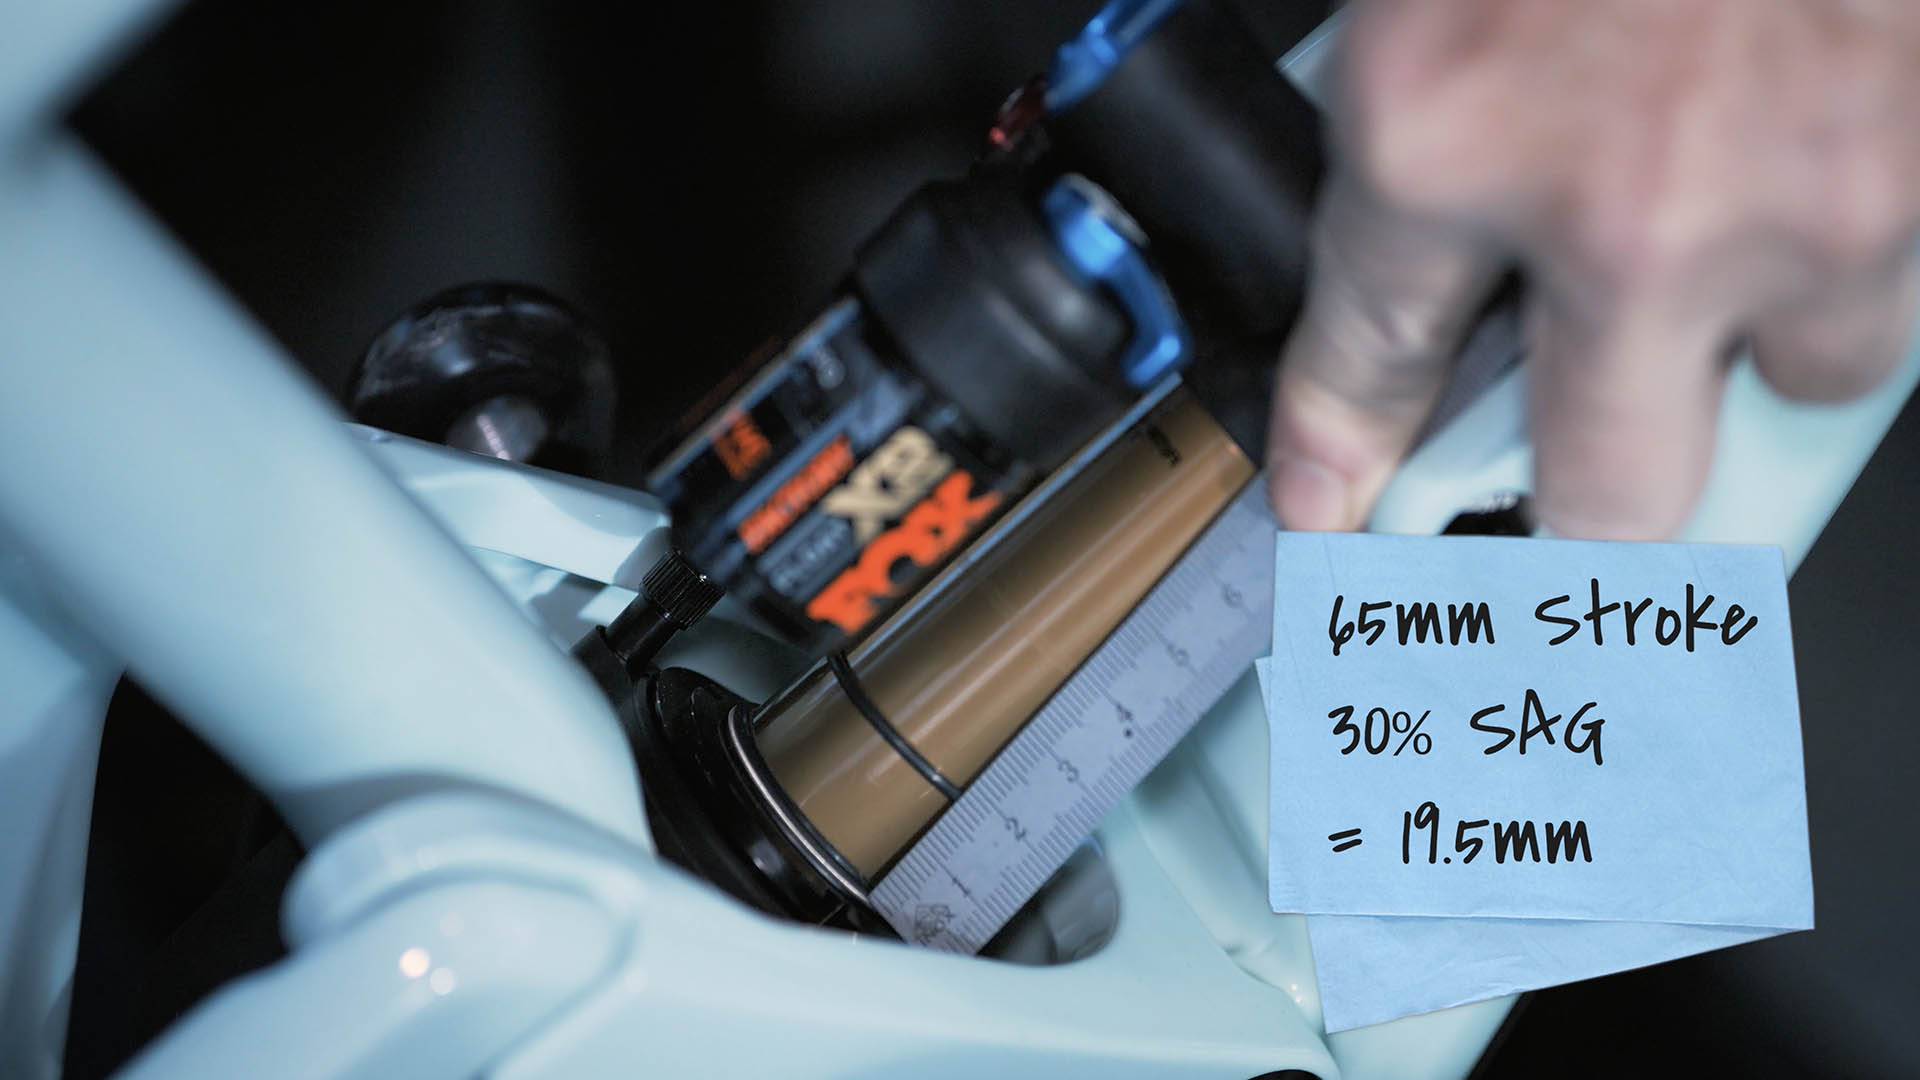
- Measure the distance between the sag indicator o-ring and the air sleeve seal. This is your sag figure.
- The SCOR 4060 was designed for optimal suspension performance with 28/30% sag at the rear shock. Since the frame can accept either 65mm, 62.5mm or 57.5mm stroke shocks, please make sure you adjust your SCOR 4060 frame suspension accordingly before using it.
|
Frame setting |
Shock stroke |
28% sag |
30% sag |
|
LT (2022) LT (2023) |
62.5mm 65mm |
17.5mm 18.5mm |
19mm 19.5mm |
|
ST |
57.5mm |
16mm |
17mm |
- Adjust the air pressure to achieve the correct amount of sag.
Remember, increasing air pressure decreases sag. Decreasing air pressure increases sag. Got it? Good!
Next, we’ll adjust the rebound damping.
- Start with the rebound dial fully open by turning it counter-clockwise as far as it will go. In this position the shock will have the least amount of rebound damping so the shock will extend quickly after compression.
- Turn the rebound dial clockwise to the fully closed position, counting the number of clicks.
- Adjust the rebound dial so that it is midway between open and closed. This should be half the number of clicks you counted.
- Go for a ride.
- Push down through the pedals to compress the shock.
- If it feels like the shock is returning too quickly and bouncing your feet off the pedals, then increase the rebound damping.
- If the shock feels like it is returning too slowly then decrease rebound damping.
Remember, you are adjusting the amount of rebound damping not the amount of rebound itself. More rebound damping means the shock will rebound slower. Less rebound damping means the shock will rebound faster.
- Adjust until you find a rebound speed you feel happy with.
Finally, we’ll adjust compression damping:
Compression damping is split into low-speed and high-speed damping. Most shocks offer adjustment to low-speed compression damping through a dial, lever, or both. Not all shocks have user adjustable high-speed compression damping.
- Start with the compression dial fully open (turned all the way counter-clockwise) and any compression adjust levers in the open position.
- Go for a ride.
- Move the compression adjuster lever from open to closed and feel the difference it makes. In the closed, or firm, position the shock employs a high level of low-speed compression, ideal for smoother climbs and sprinting.
- If, with the compression adjustment lever in the open position, you feel the bike moves too much with rider weight shifts or other slow-speed inputs, increase the low-speed compression damping.
- High-speed compression adjustment, if available, can be used to control the shock’s ability to deal with large impacts and landings. If the shock uses its travel too quickly during a large or high-speed impact increase the high-speed compression damping.
How do I set up my air sprung forks?
As a starting point we recommend that forks are set with 20% of the available travel as sag.
|
Fork travel |
20% sag |
|
170mm |
34mm |
|
150mm |
30mm |
- Make sure all adjustments on the fork are fully open. Turn the compression and rebound adjuster fully counter-clockwise.
- Make sure the fork is fully deflated.
- Refer to the manufacturer’s manual for a baseline pressure based on your weight, including riding gear. In some cases, the recommended air pressure can be found on the fork lowers.
SCOR SPRING RATE CALCULATOR - Attach the shock pump and inflate the air chamber to the recommended air pressure.
- Detach the pump and compress the suspension through at least 50% of its travel five times by pushing down on the handlebars.
- Recheck the air pressure and top up if required.
- With riding gear on, mount the bike.
- Leaning against a wall or with a friend holding the handlebars, compress the suspension three times.
- Slide the o-ring on the fork stanchion down so that it meets the rubber seal of the fork lower.
- Without compressing the fork, step off the bike.
- Measure the distance between the rubber seal and the o-ring. This is your sag measurement figure.
- Add or remove air to achieve the correct sag.
Remember! Increasing air pressure decreases sag. Decreasing air pressure increases sag. That’s right.
Next, let’s adjust the rebound damping.
- Start with the rebound dial fully open by turning it counter-clockwise as far as it will go. In this position the fork will have the least amount of rebound damping so the fork will extend quickly after compression.
- Turn the rebound dial clockwise to the fully closed position, counting the number of clicks.
- Adjust the rebound dial so that it is midway between open and closed. This should be half the number of clicks you counted.
- Go for a ride.
- Push down through the bars to compress the fork.
- If it feels like the fork is returning too quickly and the front wheel is bouncing off objects then increase the rebound damping.
- If the fork feels like it is returning too slowly then decrease rebound damping.
Remember, you are adjusting the amount of rebound damping not the amount of rebound itself. More rebound damping means the fork will rebound slower. Less rebound damping means the fork will rebound faster.
- Adjust until you find a rebound speed you feel happy with.
Finally, we’ll adjust compression damping.
Compression damping is split into low-speed and high-speed damping. Most forks offer adjustment to low-speed compression damping through a dial, lever, or both. Not all forks have user adjustable high-speed compression damping.
- Start with the compression dials or lever fully open (turned all the way counter-clockwise).
- Go for a ride.
- Move the low-speed compression adjuster lever from open to closed and feel the difference it makes.
- If, with the compression adjustment lever in the open position, you feel the bike moves too much with rider weight shifts or other slow-speed inputs, increase the low-speed compression damping.
- High-speed compression adjustment, if available, can be used to control the fork’s ability to deal with large impacts. If the fork uses its travel too quickly during a large or high-speed impact, increase the high-speed compression damping.
How do I set up my coil sprung forks?
As a starting point we recommend forks should be set with 20% of the available travel as sag.
|
Fork travel |
20% sag |
|
170mm |
34mm |
|
150mm |
30mm |
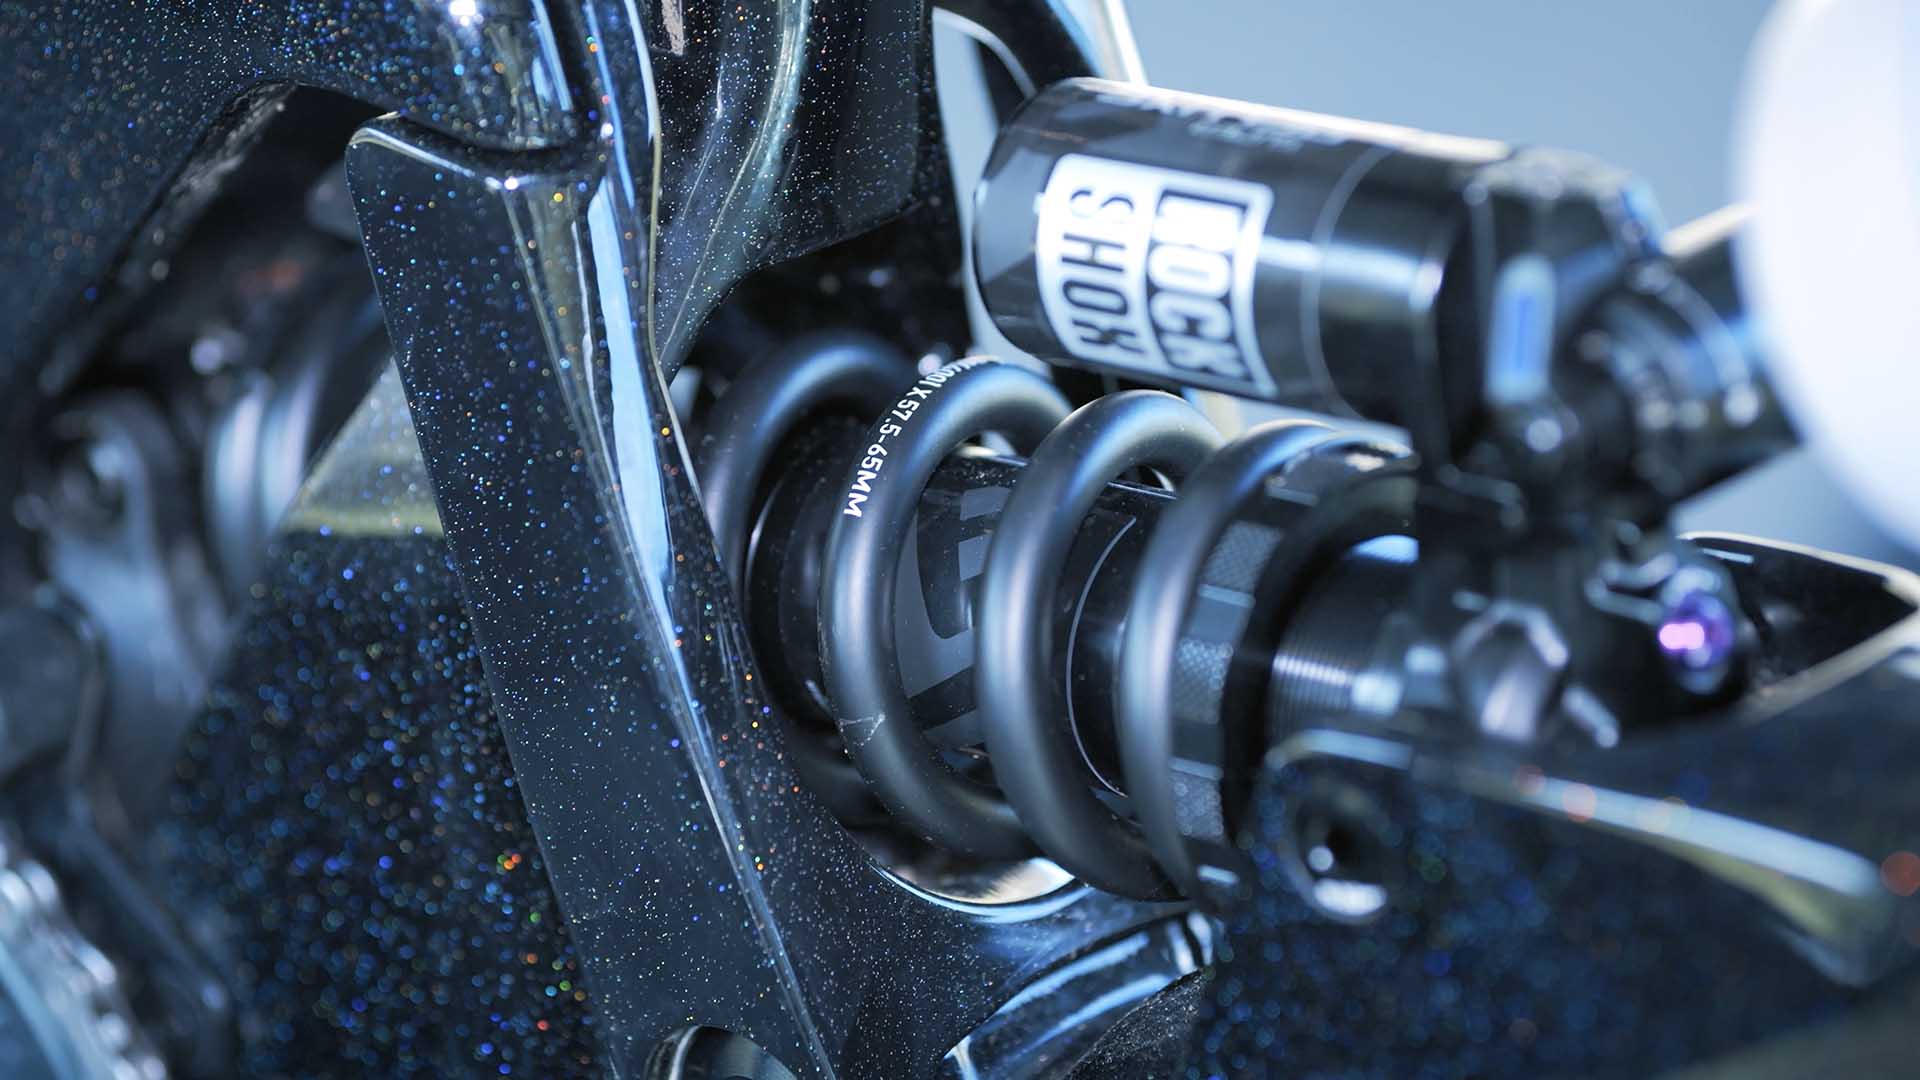
- Make sure all adjustments on the fork are fully open. Turn the preload, compression and rebound adjuster fully counter-clockwise.
- With riding gear on, mount the bike.
- Leaning against a wall or with a friend holding the handlebars, compress the suspension three times.
- Slide the o-ring on the fork stanchion down so that it meets the rubber seal of the fork lower.
- Without compressing the fork, step off the bike.
- Measure the distance between the rubber seal and the o-ring. This is your sag measurement figure.
- If there is too much sag, turn the preload adjuster clockwise, adding preload to the spring, and repeat the sag measurement process.
- If the desired sag cannot be achieved using the preload adjuster, the coil spring must be replaced with either a softer or firmer spring.
To increase sag, install a softer coil spring.
To decrease sag, install a firmer coil spring.
Please refer to your fork manufacturer’s manual or website for details on how to do this.
Now let’s adjust the rebound damping.
- Start with the rebound dial fully open by turning it counter-clockwise as far as it will go. In this position the fork will have the least amount of rebound damping so the fork will extend quickly after compression.
- Turn the rebound dial clockwise to the fully closed position, counting the number of clicks.
- Adjust the rebound dial so that it is midway between open and closed. This should be half the number of clicks you counted.
- Go for a ride.
- Push down through the bars to compress the fork.
- If it feels like the fork is returning too quickly and the front wheel is bouncing off objects then increase the rebound damping.
- If the fork feels like it is returning too slowly then decrease rebound damping.
Remember! You are adjusting the amount of rebound damping not the amount of rebound itself. More rebound damping means the fork will rebound slower. Less rebound damping means the fork will rebound faster.
- Adjust until you find a rebound speed you feel happy with.
Finally, let’s adjust compression damping.
Compression damping is split into low-speed and high-speed damping. Most forks offer adjustment to low-speed compression damping through a dial, lever, or both. Not all forks have user adjustable high-speed compression damping.
- Start with the compression dials or lever fully open (turned all the way counter-clockwise).
- Go for a ride.
- Move the low-speed compression adjuster lever from open to closed and feel the difference it makes.
- If, with the compression adjustment lever in the open position, you feel the bike moves too much with rider weight shifts or other slow-speed inputs, increase the low-speed compression damping.
- High-speed compression adjustment, if available, can be used to control the fork’s ability to deal with large impacts. If the fork uses its travel too quickly during a large or high-speed impact, increase the high-speed compression damping.
That’s it. Short and sweet. Suspension Setup Rule #1? Rinse and repeat.