HOW TO GIVE YOUR BIKE A MULLET
A mullet? Say what?
A mullet is a questionable haircut that is short at the front but long at the back. It’s also the term for a bike that uses different wheel sizes front to back, typically a 29” wheel at the front and a 27.5” wheel in the back. Because y’know, business up front, party in the back.

Why do I want a mullet?
As with hairstyles, this is mostly personal preference. Some riders find a smaller rear wheel feels better on the steep stuff, helps them turn quicker and feels a bit more playful, but by keeping a 29” wheel up front they keep that invincible, monster truck feel.
Sounds good! What do I need?
Changing your 4060 from its standard 29” set-up to a mullet set-up is pretty straightforward. You will need the following components and tools.
• A 27.5” rear wheel with Boost 148 spacing
• Torque wrench with 5mm and 4mm hex bits
• PTFE Grease
•
Threadlock compound
You may also need a T25 Torx bit, cassette lockring tool and chain whip to transfer the disc rotor and cassette over to the new wheel. A headset cup removal tool, rubber hammer and headset press may also be required, but more on that later.
No scissors, clippers or razors required.
Okay, let’s get started.
1. Place the bike securely in a work-stand ensuring you have
space to work around the bike.
2. Shift the
chain to the smallest cog on the cassette.
3.
Push the lower cage of the rear mech forward to take tension out of the chain. Use the
Cage Lock button on the SRAM rear mech to lock the cage in place.
4. Undo the rear axle using a wrench and 4mm hex
bit.
5. Remove the 29” rear wheel and, if
needed, swap the cassette and disc brake rotor to the 27.5” wheel. Remember, the tire
from your 29” wheel definitely won’t fit!
Stop! Before going any further you need to know that swapping to a smaller rear wheel lowers the bottom bracket height and slackens the seatube and headtube angles.
If that sounds good to you, then skip to Step 6. But if you want to keep your geometry much as it was before, then read on.
For a bike in ST configuration rotating the flip-chip to the LT setting will raise the bottom bracket and compensate for the changes a 27.5” rear wheel causes.
• To do this, use a wrench and a 4mm hex bit to remove the
bolt that runs through the flip-chip.
•
Supporting the subframe in one hand, remove the shock mount.
• Remove and rotate the flip-chip so that the line is above the
LT setting on the frame.
• Lightly grease the
shock mount and reinstall it through the shock and flip-chip.
• Apply threadlock to the bolt’s threads and tighten to
8Nm.
For a bike in LT configuration the flip-chip is already in the high position, so if you want to raise the bottom bracket you will need to make use of the angle-adjust headset and put it in the steeper setting.
• To do this, remove the front wheel.
• Remove the front brake caliper from the forks along with the
brake hose guide.
• Loosen the stem’s steerer
bolts.
• Whilst supporting the fork in one hand
carefully loosen and then remove the headset top cap.
• Remove the stem, headset spacers, top cone, and compression
ring.
• Slowly remove the fork from the frame
being careful not to lose any parts of the headset.
• Remove the headset bearings.
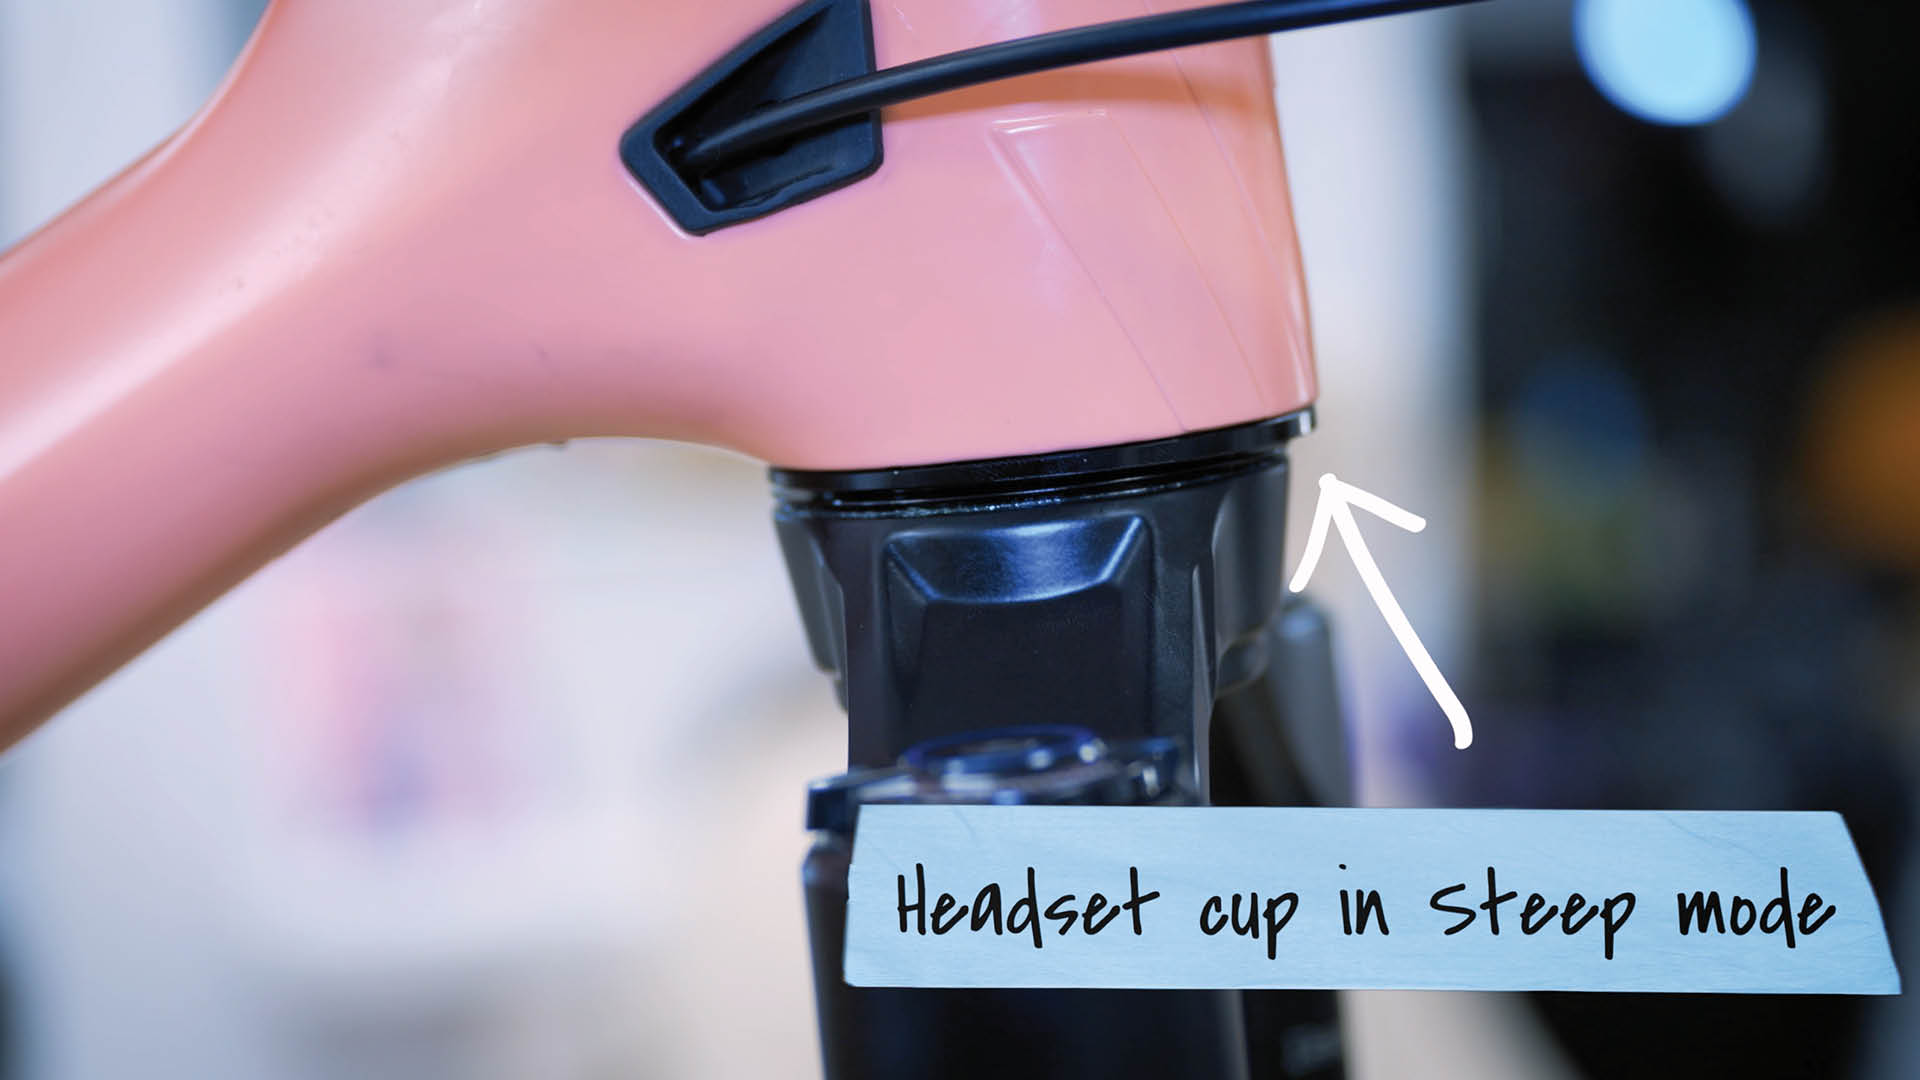
• Note the location of the notch in both headset cups. With the
notch facing forward the frame is in its slackest setting. To raise the bottom bracket
the notches should be facing backwards.
• Use a
headset removal tool to gently knock out both headset cups.
• Apply a thin layer of grease to the inside of the
headtube.
• Use a headset press to carefully
reinstall the headset cups one at a time with the notch facing
backwards.
• Apply a thin layer of grease to
the inside of the headset cups and the headset bearings.
• Reinstall the rest of the headset components, spacers, forks,
stem, and headset top cap. Install the front wheel and front brake caliper.
With any adjustments made to the frame, it is now time to install the 27.5” rear wheel.
6. Lightly grease the rear axle.
7. Insert the 27.5” rear wheel into the frame and slide the
axle through the frame and wheel, ensuring the chain is correctly routed over the
cassette.
8. Tighten the rear axle to 14Nm
using a torque wrench.
9. Press the Cage Lock
button to release the lower cage of the rear mech.
10. Make sure that the gears are properly indexed and the disc
brake rotor doesn’t rub.
And you’re done. Now, it’s time to hit the trails and get down to business on some party laps.
Hey, have you done something with your wheels? They really suit you.